Photographing Bloodstains: Bluestar Reagent

Nick Olivier • 7 July 2016

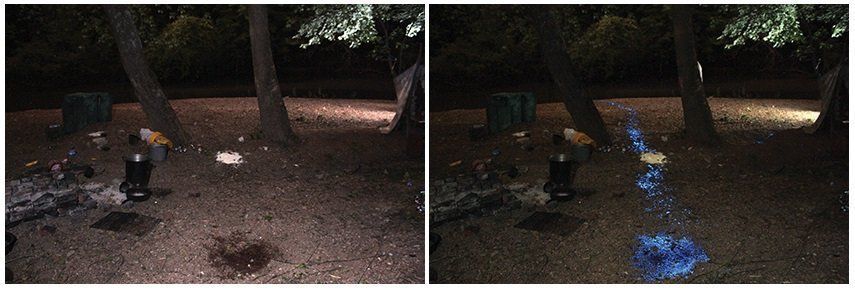
In late summer of 2012, police officers in a small, Midwestern town were called to the scene of a homicide. The caller indicated they had been exploring the creek in a wooded area on the north end of town and located a deceased male weighted down by rocks in the creek.

The victim had significant wounds to the neck that appeared consistent with a large, edged weapon. Further examination of the area revealed an approximately 20-yard blood trail that led back to a large pool of blood in a homeless camp next to the creek. Police located a machete in between two trees near the blood trail. Investigators did the best they could to document the trail of blood in the daylight; however, due to the length of the trail, they were unable to show it in its entirety.
Investigators returned to the scene after dark in an effort to obtain a photograph of the blood trail utilizing Bluestar Forensic latent bloodstain reagent, a luminol-based blood-visualizing chemical that causes trace amounts of blood to luminesce. The process of photographing bloodstains in an outdoor crime scene requires several important pieces of equipment and adequate personnel in order to capture the luminescence after the application of the chemical, while at the same time illuminating the scene adequately enough for the viewer to appreciate the composition of the crime scene. This list includes:
  • Digital SLR camera with a minimum of f/3.5 capability
  • Tripod
  • Cable shutter release cable or remote (for extended shutter times required)
  • One or more external flashes
  • Bluestar Forensic latent bloodstain reagent, minimum of two bottles of prepared solution in spray bottles
  • Enough personnel to operate camera, flashes, and spray bottles
Several factors about the use of a DSLR in low-light scenes should be kept in mind when utilizing this technique. First and foremost, the camera settings must be set to the widest aperture possible and the lens must be in manual focus mode—otherwise, in near total darkness, the camera will attempt to focus itself by emitting light from the LED on the camera, which in turn can ruin the image. Second, a tripod and a cable shutter release or remote shutter release must be used in an effort to eliminate movement from holding the camera by hand or even by depressing the shutter for an extended period of time. In this case, because the scene was located in a wooded ravine with very little ambient light and no moon, the final exposure required a 255-second time frame. Without the tripod and cable release, the image would likely have been blurry due to movement of the camera. Prior to beginning the exposure, ensure your focus is correct by illuminating the scene with a light source.

Next, in a large outdoor scene such as this, the use of external flashes is required in order to illuminate the area beyond what a single flash would be able to show. Keep in mind it is best to have those who are operating the flashes ensure they are standing out of view of the camera. The required flashes can be activated at any time during the exposure, but it is recommended to either fire the flashes at the beginning of the exposure or the end of the exposure to ensure you do not illuminate personnel who are applying the Bluestar through the spray bottles.

Finally, ensure those spraying Bluestar keep moving during the exposure for two reasons: 1) to maintain application of the chemical, ensuring the luminescence is visible for the entire exposure; and 2) to prevent any ambient light from illuminating them during the long exposure. Additionally, more than one test exposure is likely to be required in order to determine the proper number of flashes and the amount of time the shutter should be open, given the lighting conditions at a particular scene.

Keep in mind, this technique of illuminating blood evidence should only be used as a way of telling the story of the event, not as evidence of presumptive positive testing for the presence of blood due to the fact the chemical reacts with other substances, such as bleach.

All of the images were captured using a Canon EOS Rebel XS SLR digital camera with an 18-55mm IS lens. The scene was in the bottom of a shallow ravine in a heavily wooded area with very little ambient light other than that provided by a moonless night sky. This technique relied on the darkness in order to allow very long exposures, ensuring the Bluestar luminescence would be visible all the way to the end of the trail.

by Nick Olivier (Ed.) 6 October 2025
Editorial: The Sydney declaration: Revisiting the Essence of Forensic Science through its Fundamental Principles
by Nick Olivier (Ed.) 1 October 2025
Editorial: Forensic Training: Bridging the Gap between Education and the Workplace
by Nick Olivier (Ed.) 1 October 2025
Editorial: Opening up Forensic DNA Phenotyping: The Logics of Accuracy, Commonality and Valuing
by Nick Olivier (Ed.) 1 October 2025
Editorial: Digital Pathology and AI in Forensic Medicine: Advances, Limitations, and Medico-legal Utility
by Nick Olivier (Ed.) 1 October 2025
Editorial: Overview of Fingerprint-Based  Blood-Grouping using Various Tools and Techniques
by Nick Olivier (Ed.) 30 September 2025
Editorial: Spotlight Cybercrime Focus: Outsmarting Real-life Criminals in the Virtual World
by Nick Olivier (Ed.) 30 September 2025
Editorial: The Evolution and Impact of Forensic Science: A Reflection on DNA Profiling
by Nick Olivier (Ed.) 30 September 2025
Editorial: New Frontiers and Challenges of DNA Analysis in Criminal Investigations.
by Nick Olivier (Ed.) 29 September 2025
Editorial: AI can simplify complexity in litigation support
by Nick Olivier (Ed.) 29 September 2025
Editorial: The Genetic Witness: Forensic DNA Phenotyping